Sunday, October 22, 2017

Installing a Domain Print Server (Part 1)

Building a domain print server is a quick and simple way to provide a small quality of life improvement for both you and your users. Even if you only have one printer in the office, a domain printer server with printers deployed through Active Directory can save you dozens of trips to your users’ desks to manually map a network printer.

I’ll be installing the Print Management components on a new Server 2016 VM in my lab, but this is definitely something that can be co-mingled with other server services if you can’t or don’t want to dedicate a server. You’ll need a couple of things in order to get started:

  • A domain-attached Windows Server on which to install the Print Management feature.
  • A network-attached printer, accessible by the print server and your users; And drivers for said printer.

Installing the Print Management Feature

I’m going to install the Print Server feature on my VM via PowerShell. This can alternatively be installed through the Add Roles and Features dialog menu, by selecting the Print and Document Services role and then the Print Server feature under role services.

PowerShell:

Done.

Adding a Printer & Drivers

Launch the Print Management console and expand Print Servers to see your local server name listed (mine is SMB-INF1), and expand that. We’re currently concerned with Drivers and Printers.
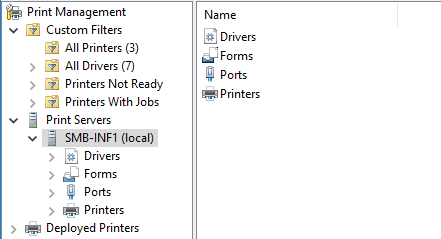

Print Drivers

Understand that there are a couple of different types of printer drivers. Microsoft introduced Type 4 printer drivers with Server 2012 and Windows 8. When printing to older OSes such as Windows 7, the print server will substitute the Microsoft Enhanced Point and Print Compatibility Driver.


In practice this compatibility driver leads to mixed printing results and I generally try to stick with Type 3 drivers in environments with a large Windows 7 installed base (which should be shrinking). That said, some Type 3 drivers have shown to not handle Windows 10 print jobs particularly well, so it’ll be up to you to test things out and select the best driver for your environment. Luckily, the Print Management console allows you to install multiple drivers and you can switch between them for installed printers with relatively little hassle.

Try to use a Universal Print Driver from your printer’s manufacturer whenever possible. This generally enables one driver to service many different models of printer from the same manufacturer, and cuts down on the number of packages you need to ultimately install on your server. You’ll also have to choose between PCL5, PCL6, and PS (PostScript). Unless you have a reason to select a different option, I recommend PCL5. It’s the most stable with generally the widest compatibility for printing most office documents.

For this lab I’ll be installing my trusty Lexmark E120n laser printer, so I’ve downloaded the Lexmark Universal Print Driver for PCL5 from their website.

Driver Installation

Ideally you do not want to install the actual driver software onto the print server. In most cases the driver package should offer the option to extract only, or you may have to dig the driver files out of the temporary folder after launching the installer.

With the driver files in hand, we can add the printer driver to our server. Within Print Management, right-click on Drivers and choose Add Driver. Then, follow the prompts in the Add Printer Driver Wizard to add the correct driver.
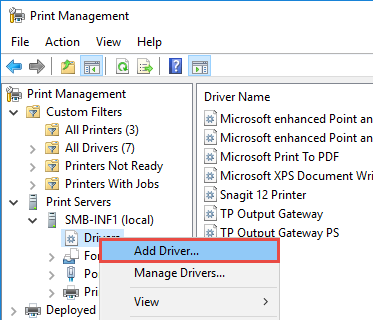

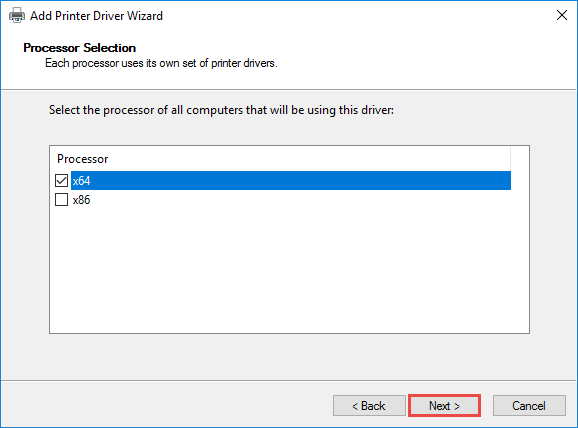
x64 should be appropriate for most environments, I hope. Click Next.

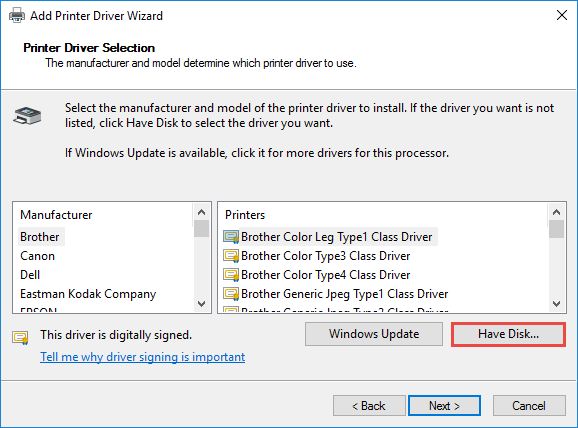
At Printer Driver Selection, click Have Disk.

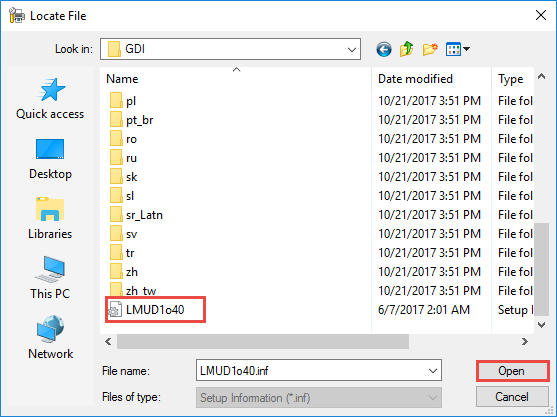
Browse to the location on your server where you saved the driver files, select the INF file and click Open. Then click OK in the Install From Disk prompt to select the driver.

If you’ve selected the correct INF file, you should see your driver listed in the Printers box.
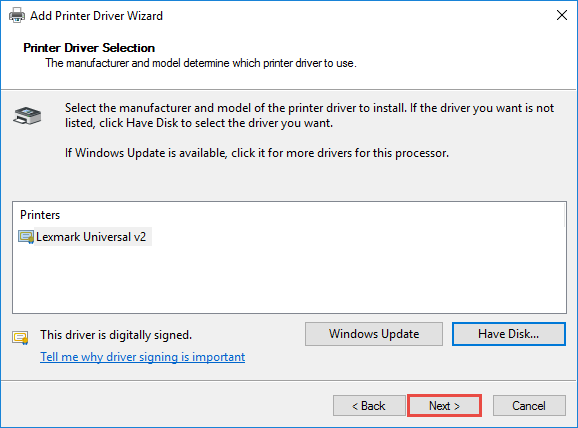

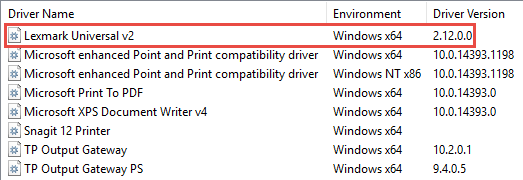
Click Next, then click Finish to complete the driver installation. You should now see the driver listed with the others in the Print Management Console.

Printer Installation

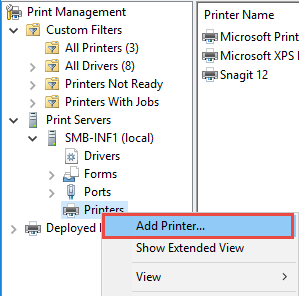
With the driver installed, we’re ready to install our network printer. Right-click Printers and select Add Printer.

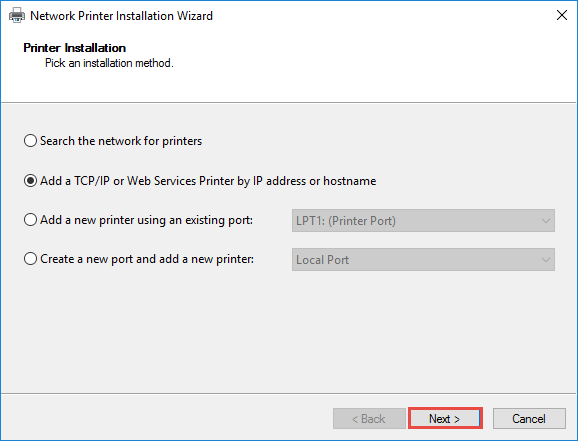
Keep the default selected to add a TCP/IP printer and click Next.

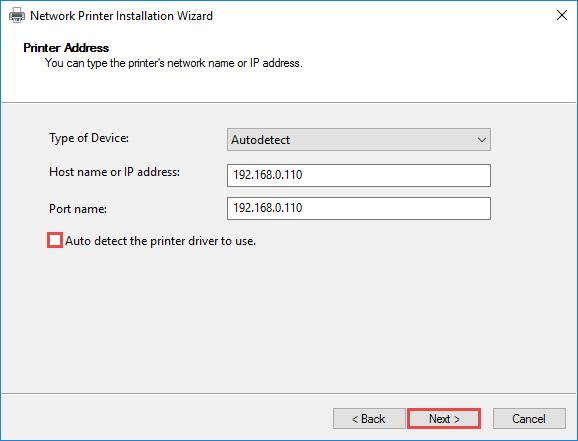
In the Printer Address menu enter the IP address of your network printer, and uncheck the box to auto detect the printer driver. Then click Next.

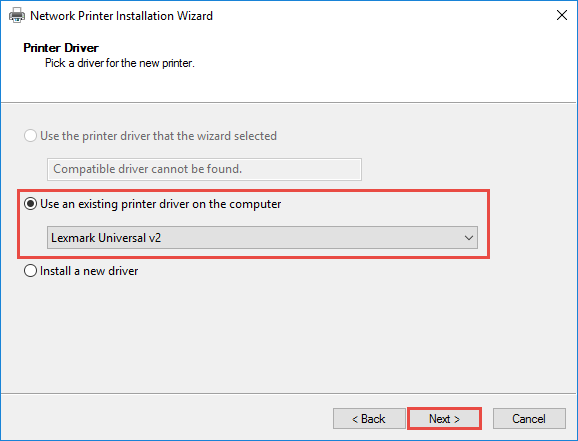
On the Printer Driver menu select the option to use an existing printer driver, and select the driver that you installed in the previous steps. Then click Next.

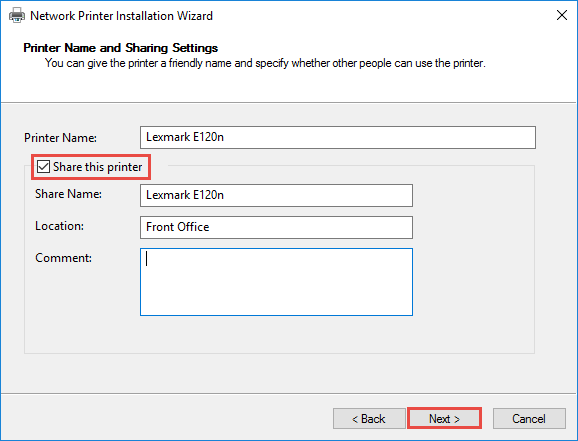
Provide a descriptive name for the printer. This is especially important if you will have multiple printers of the same model and/or spread across a large campus. A naming convention like Building-Floor-Room# can be helpful here, if necessary. Since I’m only working with the one printer today, I’ve named it with the make and model. Be sure to update the share name if necessary and check the box to Share this printer. Then click Next, Next again, and Finish.

Check the box to print a test page in order to confirm that the driver you installed is working as expected.
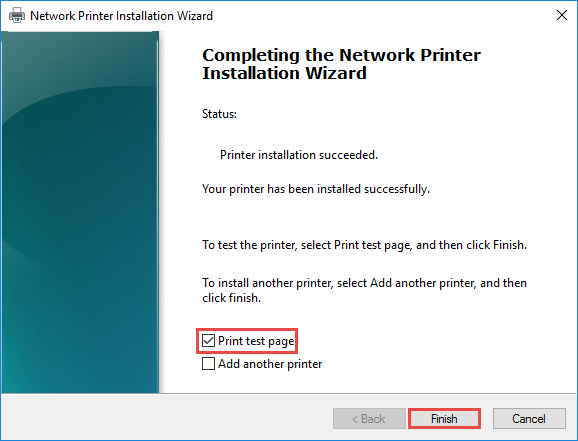

With the printer installed, right click on the printer name in the listing and choose Properties. This is the time to review various print settings for the model you’ve installed and ensure that they are aligned with your organizational standards. I’ve found that some drivers like to turn on things like duplexing, for example, which may not be desireable as a default setting.

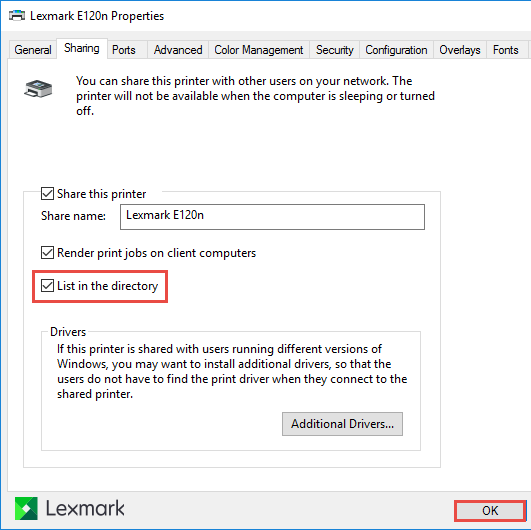
Be sure to check out the Sharing tab and check the box to list the printer in the directory. This publishes the printer with Active Directory so client computers can quickly find it via the Devices and Printers wizard.

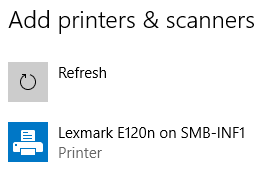
From a domain client computer, we can see that the printer is listed in AD and available to be installed.

You can also configure typical Windows security permissions on the printer object, if desired. The default setting is to allow the Everyone group permission to print to every printer. This may not be desirable in some cases, such as for a large format printer in the Marketing department or a check printer with expensive MICR toner in the Accounting department. In those cases you can remove the Everyone group and add just the specific AD user groups that should be allowed to print.

And that’s it. The printer is installed on our server and published to AD DS, ready to be discovered and installed by our users. In part two we’ll review the options for deploying our printer automatically across the organization.

Installing a Domain Print Server (Part 2)

Sunday, August 13, 2017

Deploying Local Admin Password Solution (LAPS 6.2)

To understand the need for LAPS we must first understand the risk associated with password reuse. Quite simply, using a single password for local administrator accounts across workstations and/or servers may be convenient for maintenance and troubleshooting, but it enables a potential attacker to have nearly free reign across Windows systems after compromising one computer.

Look no further than mimikatz and it’s inclusion in the NotPetya malware for a real-world example of stealing administrative credentials out of memory. If an attacker breaches one system in this manner and we’re only using one password for local admin accounts, our entire Windows network could be compromised just like that.

Let’s not forget the other, less malicious reasons that reusing a single local admin password is a bad idea. Users can lose the ability to log in with their domain accounts for any number of reasons, and machines can lose their association with the domain, requiring a local admin account to repair. If we need to share the local admin password with a remote end-user or a help desk tech and all of our local admin passwords are the same, we just gave someone the password for every workstation in the company - and possibly every server. That’s not smart security.

The free LAPS software and group policy settings mitigate this risk by randomizing local admin passwords and changing them automatically on a schedule that we set. At any given time, every machine that is managed by LAPS will have a different and random password that is stored in AD and retrievable by an administrator as needed.

The setup is about as straightforward as it gets:
  • Download the LAPS software from Microsoft, here. There are 32 and 64 bit versions depending on the OS of the clients you'll be installing it on. There are two components to the LAPS software; the AdmPwd GPO extension that is installed on the clients whose passwords you'll be randomizing, and the management tools that are installed on the machine you'll be managing LAPS from.
  • I'm installing the management tools on the domain controller in my lab, so I've copied the MSI installer to that machine and launched it.
  • On the Welcome screen, click Next.
  • Accept the End User License Agreement and click Next.
  • The default installer selection will install the AdmPwd GPO Extension and not the management tools. We want to reverse this and install just the management tools at this stage. If you're installing the management tools on a non-domain controller, you can include the GPO Extension if you want that system's local admin password to be managed by LAPS. Click Next after you've selected the appropriate options.
  • Click Install.
  • Click Finish.
  • With the management tools installed, it's time to extend our AD schema to include the necessary attributes for LAPS passwords. This is done by running PowerShell as an administrator. Start by importing the AdmPwd.ps module.
  • Then, run the command to update the schema.
  • Next, we need to give our machines rights within AD to update the new password and expiration timestamp attributes. This is also done in PowerShell by pointing the command to the OU(s) containing your computer objects.
  • In addition to allowing our machines to update their own password attributes, we may want to allow a set of users or groups to force a password expiration. I've created an AD group for password administrators and will apply that permission to that.
With the management tools installed and Active Directory primed, it's time to build a couple of GPOs. I'm going to deploy the LAPS MSI to client machines in my lab using group policy, but any deployment method should do just fine. By default the MSI will load the AdmPwd GPO Extension, which is all we need on the client machines.
  • To deploy LAPS with a GPO, I created a new policy named Install LAPS, and created a new Assigned Software Installation, pointing to the LAPS MSI on a network share that I setup. I made sure that Domain Computers has Read access to the network share so my client machines can retrieve the installer.
  • Next, I've created a new GPO named Configure LAPS. There are four options that we care about under Computer Configuration > Policies > Administrative Templates > LAPS. I'm generally selecting the defaults for each option for this lab setup.
  • Password Settings should be changed to Enabled. Configure the Complexity, Length, and Age as desired. I would recommend setting the values to match your overall user password policy.
  • Name of administrator account to manage can be changed if desired, however I'm leaving it set to Not Configured so it will manage the default "Administrator" account for me. If you have a custom local administrator account on your machines (which is highly recommended in production environments as the BUILTIN\Administrator account is easy for an attacker to attempt brute-forcing, even if you've renamed it), set the setting to Enabled and provide the name of the administrator account that you want LAPS to manage.
  • Do not allow password expiration time longer than required by policy should be set to Enabled unless you have a reason that local admin passwords should not adhere to the configured domain password expiration setting.
  • Lastly, Enable local admin password management is the master On/Off switch for LAPS. Set it to Enabled.
  • Now it's time to apply our new GPOs to the container with our computer objects.
With the GPOs applied, we can now test to ensure that LAPS is being installed and configured on client machines. On my client VM I ran gpupdate /force from an administrative command prompt to force a group policy update, and then rebooted. Under Control Panel > Programs and Features I can see that LAPS was installed successfully. At this point I've found that it takes an additional group policy update before the updated password attribute will propagate to Active Directory. This'll happen automatically or you can force it with another gpupdate /force on the client machine.
To view the local admin passwords set by LAPS we have two options.
  • The first is searching through the Attribute Editor for the particular computer object (or via ADSIEdit).


  • The second and preferred option is to use the LAPS UI program that is installed as a part of the management tools.

At this point we're effectively done with the setup. As your computers in the selected OU(s) receive the new policy and eventually reboot, they'll install the LAPS client and begin populating AD with the local admin password info.

The last thing we want to do before wrapping up is to validate that only the users we want have the ability to see these new attributes within AD. After all, this is all for naught if a clever user discovers read access to all of the local admin account passwords. Thankfully, Microsoft has thought of this and provided a PowerShell cmdlet for identifying the accounts and groups that have access to the AdmPwd extended rights.
  • Run the Find-AdmPwdExtendedRights cmdlet at an administrative PowerShell window, providing the identity of the OU containing your managed computers.


    By default this only contains SYSTEM and Domain Admins, which I'm OK with. If you've modified container permissions in AD to delegate access or for a different reason you may have users or groups with visibility of the password attributes that have no need to see that information.
  • To prevent a user or group from seeing the password attributes or to enable a user or group to see that information, turn on Advanced Features for the Active Directory Users & Computers snap-in (View > Advanced Features), then right-click on the OU containing your computer objects and select Properties. Select the Security tab and then click the Advanced button.


  • Find the principal name that you want to modify (if you're removing permission) and click Edit.


  • The permission to modify is called All Extended Rights. Uncheck the checkbox to remove this permission from the selected principal. Microsoft cautions that this will remove ALL extended rights, not just those pertaining to LAPS, so ensure that this permission isn't needed otherwise.


  • For my lab with default permissions I do not have any users or groups with access that shouldn't have it, so I'll add my password administrators AD group and enable the All Extended Rights permission.


    I can now apply the PwdAdmins role to my help desk team, for example, in order to grant them the ability to see local admin passwords and force expiry as needed.
And that's it. With a few minutes of work we've automated local admin password changes across our domain computers, and made it quite a bit harder for an attacker to pivot through our network with stolen local admin credentials.

Thursday, July 13, 2017

Securing Kibana with an IIS Reverse Proxy and Windows Authentication

In the absence of Elastic’s for-pay X-Pack add-on package, the Elastic stack is lacking several notable features which, in my opinion, are absolutely required if it is to be used in production. One such feature is user authentication. Once you’ve configured Kibana to be accessible over the network, any Joe or Sally with network access can browse to or stumble upon your Kibana dashboard and start digging through your log data. Not great.

In this post, we’ll take a few simple steps toward providing some basic security for our Elastic front-end, while remaining free of cost and entirely in the Windows world. We’ll accomplish that by installing IIS on our Elastic server, and configuring it as a reverse proxy for Kibana, authenticated to a security group of our choosing.

Why Use a Reverse Proxy?

Since Kibana doesn’t support any sort of authentication mechanism out of the box, we have to be creative. By using the reverse proxy feature in the URL Rewrite extension for IIS, we can use IIS as a middleman between our clients and the otherwise unprotected Kibana UI. We'll restrict Kibana connections to the local server only, and set IIS as the gatekeeper for outside connections. Conveniently, this also enables us to configure SSL within IIS as we would with any other website.

Getting Started

To start, we need to ensure that Kibana is only listening for connections on localhost (127.0.0.1). We’ll do that by reviewing the Kibana configuration file and verifying with netstat. If you followed my previous guide on installing the Elastic stack, the defaults should already be set correctly for what we are doing now.

  • Locate the kibana.yml configuration file in the config directory and open it with a text editor. Unless you’ve modified these values, at the top of the file you should see server.port: 5601 and server.host: “localhost”. These are the settings that we want, as server.host: “localhost” will prevent Kibana from accepting connections from anywhere other than the local server. The server.port value doesn’t really matter as we’re only using it locally on this server, so I’ve kept the default there as well.


  • If you’re using a firewall (like Windows Firewall) on the local server or a hardware appliance on your network, you can go ahead and close port 5601 at this stage, if necessary. Nothing will be accessing the server over the network on that port once we’re done.
  • As the final check of our Kibana configuration, we can use netstat to validate that Kibana is listening on 127.0.0.1:5601, as that’s where we’ll be pointing our IIS Reverse Proxy.


Install IIS Components

To start off, we’ll need to install the Web Server role along with URL Authorization, Windows Authentication, and Management Tools. You can accomplish this manually via the Add Roles and Features Wizard in Server Manager or via Powershell.


Install-WindowsFeature Web-Server, Web-Url-Auth, Web-Windows-Auth -IncludeManagementTools

With the required features installed, it’s time to configure our reverse proxy.

Configure the IIS Reverse Proxy

Rather than trying to reinvent the wheel, I followed parts one and two of this fantastic guide on Microsoft Blogs for the reverse proxy setup, which I’ll be recapping below. The guide contains a lot more detail on the why and how, if you’re interested. I did not follow part 3 of the guide as it was not necessary.


  • Launch IIS and select the website you'll be configuring as the reverse proxy. Click on the URL Rewrite feature in the center panel.


  • Then, Add Rule(s)... in the Actions panel on the right.


  • In the Add Rule(s) dialog, select Reverse Proxy and click OK.


  • Click OK again to enable proxy functionality within Application Request Routing.


  • In the Add Reverse Proxy Rules dialog under Inbound Rules, we’ll give it our Kibana URL (localhost:5601) as the location where requests will be forwarded. We also want to enable Rewriting of domain names under Outbound Rules and populate the external URL for our server under the To: field. In this case the external URL will be whatever our clients on the network will type into their browsers to access Kibana. I’m just using the server name in my lab environment. Click OK to complete the dialog.

Now we have the basic reverse proxy routing in place, but we’re not quite done yet. If we try to access Kibana via IIS at this stage, we’re greeted with an unfriendly 500.52 error.


What’s happening is that Kibana is using HTTP compression when returning results to IIS, and the URL Rewrite module can’t modify the response when it's compressed. The workaround for this is to configure IIS to tell Kibana not to return compressed responses.

  • With our website selected let’s go back to the URL Rewrite module. This time we’ll choose View Server Variables…


  • On the Allowed Server Variables screen, choose Add… to add a new server variable called HTTP_ACCEPT_ENCODING, and click OK. Follow the same process to add a second variable called HTTP_X_ORIGINAL_ACCEPT_ENCODING.

  • Next, go back to URL Rewrite rules and select the inbound rule. Then click Edit…


  • On the Edit Inbound Rule screen, expand the Server Variables section and click Add… Select the HTTP_X_ORIGINAL_ACCEPT_ENCODING variable that we created earlier from the Server variable name: drop-down box. Under Value: type {HTTP_ACCEPT_ENCODING}. Be sure to include the curly braces so the rule knows to use the value of that variable. Click OK.

  • Click Add… again to add another server variable. This time select HTTP_ACCEPT_ENCODING from the drop down box, and type any text value into the Value: field. What we need to do here is set the value of this variable to be empty, but this field won’t accept a blank value so we’re giving it any text value so we can save the variable, and we’ll update the value in the next step. I typed “123” as my value.


  • With both variables set, click Apply in the Actions panel.


  • Now we need to replace our arbitrary text value (“123” in my case) with a blank. This is done in our website’s web.config file. Since I’m using the Default Web Site, that’s located in C:\inetpub\wwwroot. Open the web.config file in a text editor and find the text value that you entered. Select the value between the quotes and delete it, leaving just the quotes. Save the file.
Before:

After:

That addresses the inbound portion of our configuration, now we need to address outbound traffic.

  • Under URL Rewrite, click Add Rule(s)... again, this time selecting Blank rule under Outbound rules.


  • We’ll name our new rule RestoreAcceptEncoding, and select <Create New Precondition…> from the drop-down menu. On the Add Precondition screen, provide the name NeedsRestoringAcceptEncoding and ensure Regular Expressions is selected from the Using: drop-down menu.


  • Click Add… to add a new condition. For the Condition input: type {HTTP_X_ORIGINAL_ACCEPT_ENCODING}, again making sure to include the curly braces. Under pattern, type ‘.+’. Click OK. Click OK again to close the Add Precondition dialog.


  • Still under the Edit Outbound Rule screen, find the Match section and set the Matching scope: to Server Variable. Type HTTP_ACCEPT_ENCODING as the Variable name:. For the pattern, type ‘^(.*)’.


  • Lastly under the Action section, ensure that Action type: is set to Rewrite. For the Value: type {HTTP_X_ORIGINAL_ACCEPT_ENCODING}, again being sure to include the curly braces. Then, click Apply.


If everything has gone according to plan, reverse proxying from IIS to Kibana should now be working. If you type http://localhost into a web browser on the Elastic server, you should see Kibana being served via IIS over port 80.

Securing Kibana

And now, finally, we can do what we set out to do: Add some security to Kibana so it isn’t openly accessible to anyone on our network.

Configure SSL Certificate

In order to ensure that we’re not passing credentials over the network in the clear, we need to configure IIS with an SSL certificate and bind it to our website. If you want to generate a certificate for this server from your internal CA or a public CA, that’s perfectly fine. I’m going to use a self-signed certificate for this lab.


  • Select the server name in the left-hand panel, and then choose the Server Certificates option.


  • We then choose Create Self-Signed Certificate… from the Actions pane.


  • Type the name you want to use for referencing this certificate. I just used the server name. Click OK.


  • With the certificate created, we can go ahead and bind it to our website. To do that, expand the server in IIS and select the website.


  • Then, select Bindings… from the Actions pane.


  • On the Site Bindings screen, choose Add…


  • On the Add Site Binding screen, choose HTTPS as the type and select your certificate from the SSL certificate: drop-down menu.


  • Click OK again to add the site binding, and then click Close to close the Site Bindings screen. Now we’ll be able to access our website over HTTPS.

Configuring User Authentication

The final step for this guide is to enable user authentication for our Kibana proxy. What I’ve elected to do in my lab environment is configure an Active Directory group with members that I’ve chosen to grant access to Kibana. This same process could also be done with a local Windows group, or individually selected user accounts if desired.

From my lab’s domain controller, I’ve created a security group called Role-G-ElasticAdmins. The specific group name isn't important. This is the naming convention that I use for denoting that this is a Global security group and it is for granting a particular business Role to a set of users. In this case, the only user with permission to access Kibana will be the SMBAdmin user.


  • Back on our Elastic server in IIS, we need to select our website and choose the Authentication option.


  • Within Authentication, we need to set Anonymous Authentication to Disabled, and set Windows Authentication to Enabled.


  • Back to the main IIS screen, we’ll now select Authorization Rules.


  • We need to delete the Allow -> All Users rule that is created by default. Then, click Add Allow Rule… in the Actions pane.


  • On the Add Allow Authorization Rule dialog, we want to select the radio button for Specified roles or user groups:, and type the name of the group for which we’re allowing access. Then, click OK.


That concludes the configuration. Let’s test it out.


  • Open a web browser on the Elastic server and type https://localhost. If all has gone according to plan, you should be prompted to enter credentials (you may have to bypass the certificate warning if you used a self-signed certificate like I did).


  • After entering your credentials, you should be greeted with the familiar Kibana interface. Take note of the address bar to ensure that you’ve accessed the site over HTTPS.


We’re now successfully proxying Kibana’s unsecured web interface on port 5601 through IIS, secured with HTTPS encryption and Windows authentication. To make the secure interface available over the network you simply need to permit HTTPS/TCP 443 through your firewall(s) as you would with any other website, and use a web browser on your client machine to browse to it by DNS name or IP address.